Just as sourdough has become very popular, so has the use of pre-ferments among home chefs striving for the best results in bread and pizza baking. Particularly, the use of biga - a dry Italian pre-ferment - is something that pizza enthusiasts have adopted to improve their doughs.
At Lilla Napoli, we don't actually have much experience with biga, which is why we've enlisted the help of biga expert Marcus from Marcus Pizza Corner. He has helped us put together this guide where you'll learn everything you need to know about biga, including what it is, how to make it, why to use it and much more.
What is biga?
Biga is a type of Italian pre-ferment that combines flour, water, and yeast in a carefully chosen mixture. By loosely mixing together the flour, water and yeast, and letting them ferment over a long period, you get a noticeably different dough.
Then, when these three ingredients have finished fermenting (usually just under a day), you knead out the dough with more water, salt and possibly flour. We talk about "% biga", referring to how much of the final dough is biga-based.
If, for example, you used 700 grams of flour in the biga mixture, and then add 300 grams of flour during kneading, you get 70% biga. The formula is: amount of flour in the biga / total amount of flour in the dough. You can also make 100% biga, and simply not add any flour in the second step of the recipe. Further down, you can read a recipe on how to make 100% biga.
Can you add something more to the biga dough?
When adding the second round of ingredients, you can also use malt or sugar. This is done because the yeast bacteria in the biga eat up a lot of the starch during fermentation, and malt/sugar kick-starts the fermentation process again. This can lead to more fermentation and a fluffier, tastier result.
In addition, malt gives a more complex flavor with subtle tones of nuttiness and sweetness, and the finished pizza crust tends to turn browner due to a lower falling number, which is really nice.
There's not much difference between various malts, but our organic wheat malt is something we know does the job well :)

Why should you use biga? - Biga's advantages
Baking pizza with biga is definitely more complicated than regular dough. So why do it? Well, the result is different and maybe even better.
A biga-based pizza is usually more digestible. This means that it's more pleasant to eat, and you can avoid the feeling of a lump of dough in your stomach that can otherwise be annoying.
Then, not infrequently, you get a higher swoosh with biga in the dough. By swoosh, we mean that the edges become higher and airier; like in Naples! In addition, the biga is more forgiving when it comes to this swoosh, as you can use a slightly lower temperature and the pizza still gets lovely edges while still being digestible.
Last but absolutely not least, the taste is affected. Exactly what is different is a bit hard to put your finger on, but the taste is simply deeper and more pronounced. The difference in taste is greatest if malt is used in the recipe.

How to make an awesome biga dough - Marcus's own recipe
Here, expert Marcus has shared his recipe for making fantastic biga. This recipe takes two days to complete, but you can make the pizzas the next day. So you need to start one day before eating. This recipe is for 100% biga; no flour is added after the first day.
The recipe is for 6 large pizzas, but of course the quantities can be varied for more or fewer.
Day 1 - Preparation of the biga
Ingredients:
-
1000 grams of flour.
-
4.5-5 deciliters of water (4.5 dl in the summer, 5 dl in the winter. The more water, the harder the fermentation).
-
2-3 grams of yeast (2 in the summer, 3 in the winter).
How to do it:
-
Start by dissolving the yeast in the water.
-
Then add the flour and stir together the pre-ferment until all the flour and water have combined to form a smooth mixture.
-
Then cover the pre-ferment in a container (preferably cylindrical) with a lid or plastic wrap. Let it then stand at 16 degrees temperature for 18 hours. Alternatively, it can stand at room temperature for 4-5 hours and then 18 hours in the refrigerator.
Day 2 - Finalization of the biga dough
Ingredients:
-
The biga from yesterday (when the dough has finished, it should have a distinct smell).
-
2-2.5 deciliters of ice water (if you've used 4.5 dl of water in the biga on day one, you should use 2.5 dl of water. This gives you 70% hydration).
-
28 grams of salt
-
10 grams of malt or sugar
How to do it:
-
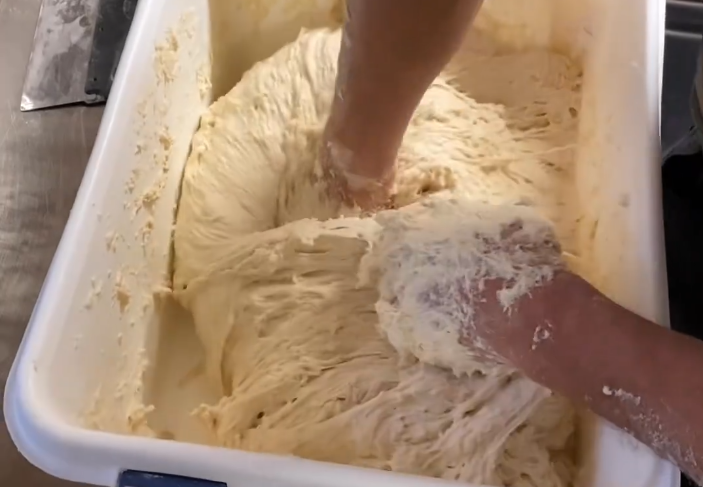
Place yesterday's biga together with half of the water in the dough mixer. Knead at slow speed until you get a dough that has come together nicely. NOTE: First, the biga breaks apart, and then it comes back together again.
-
When the dough has come together, increase the speed on the dough mixer. Then add the salt and malt if you wish (or sugar alternatively). Then it's time to pour in the remaining water; however, you must add a little at a time, so that the dough has time to "swallow" the water. Keep adding water until all the water is used, and be careful that the temperature doesn't get too high.
-
When the dough is finished kneaded, it should be strong and almost gum-like in consistency. It should also pass the so-called windowpane test. This means you should be able to stretch out a piece of dough until it becomes so thin that you can almost see through it. This must happen without the dough breaking.
-
When the dough passes the test, take it out of the mixer and fold it into a bouncy ball-like shape. Let it rest for 30 minutes.
-
Then shape the dough into balls of 260-280 grams each to make large pizzas of about 36 cm. The pizzas are ready for baking 3 hours after making the balls (faster if it's hot outside).
Extra tips:
-
A really good dough mixer makes bigamous baking much easier. Here, Marcus recommends a